Loading cart contents...
Documentation
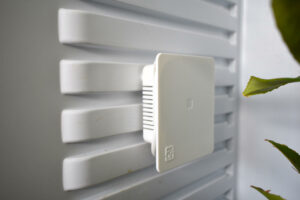
Controller
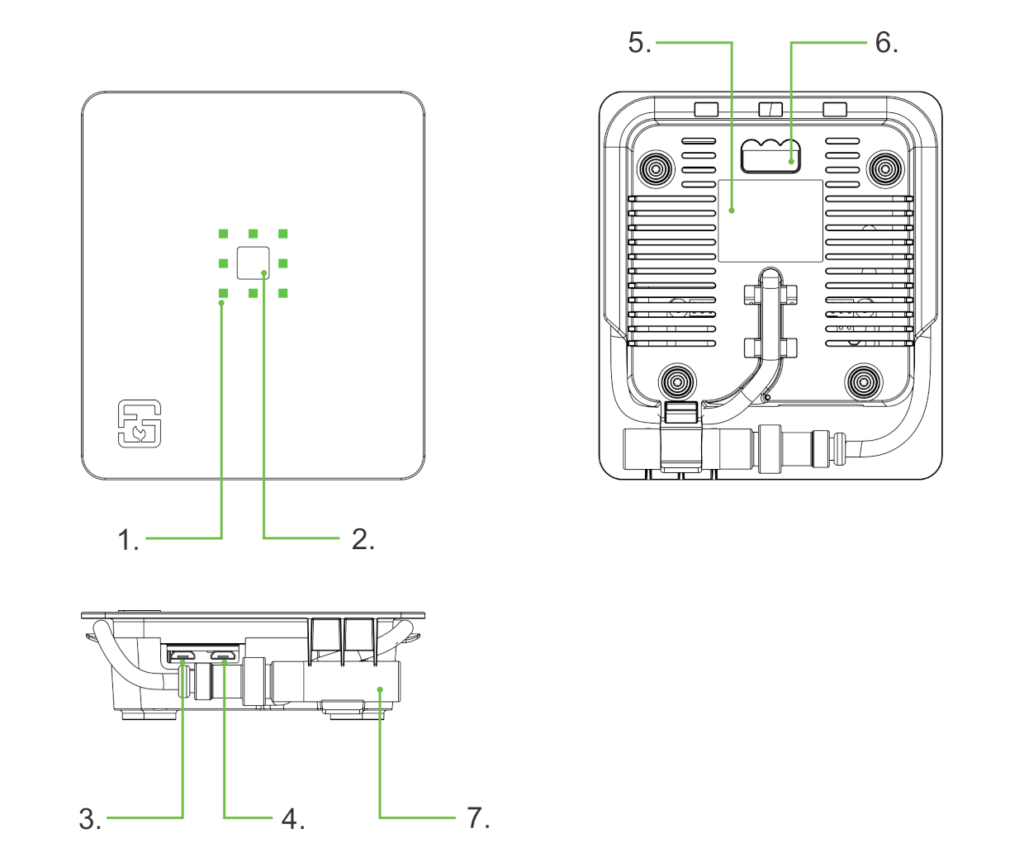
- Status LEDs
Show the current state of your Fridge Grow Controllers. - Button
Hold for 30sec to reset the controller to default settings. - Supply
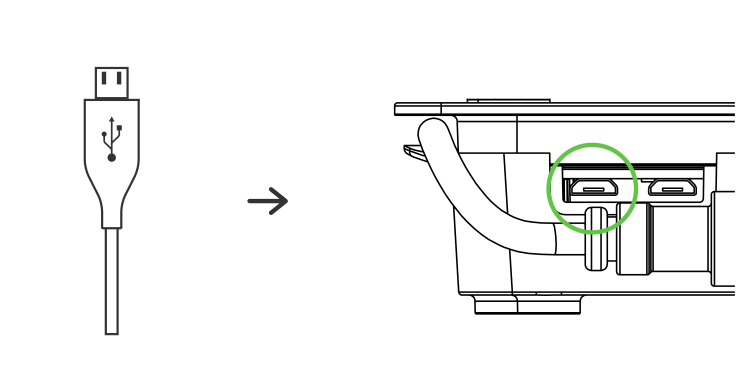
Micro-USB supply, min. 2A - Webcam
This function is no longer supported. - Label
Serial number and WiFi credentials. - Mount
Can be hooked on a simple screw. - Sensor
Can be placed freely.

Ready – solid green
Everything OK. Your controller is configured and working.

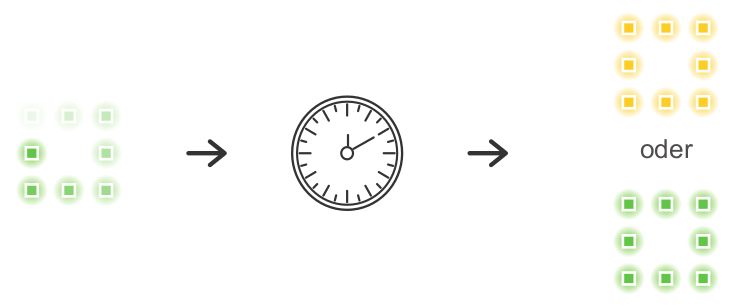
Booting – green circle
Takes around one minute.

Not yet configured – solid yellow
You need to configure your controller before it can work.

Connected – blue/green circle
The controller is currently being accessed via the app or web-interface.

Update in progress – green/yellow circle
Your controller is currently updating. Please do not power off!

Programming mode – single yellow led in circle
The mode to configure your AC sockets is currently active. Be aware that control is disabled during this mode!

Connection attempt – blue circle
The controller is currently trying to connect to the specified WiFi network.

Warning – flashing green/yellow
A minor problem has occurred. Connect to your controller to learn more.

Error – flashing green/red
A major problem has occurred. Connect to your controller to learn more.

Hardware error – solid red
A serious hardware error has occurred. Please contact our support.
To reset your controller to factory defaults press and hold the button in the center of the controller until all LEDs have turned yellow. (Your controller must not be booting or updating.)
Controller
- Status LEDs
Show the current state of your Fridge Grow Controllers. - Button
Hold for 30sec to reset the controller to default settings. - Supply
Micro-USB supply, min. 2A - Webcam
Webcam can be connected via OTG adapter. - Label
Serial number and WiFi credentials. - Mount
Can be hooked on a simple screw. - Sensor
Can be placed freely.
Ready – solid green
Everything OK. Your controller is configured and working.
Booting – green circle
Takes around one minute.
Not yet configured – solid yellow
You need to configure your controller before it can work.
Connected – blue/green circle
The controller is currently being accessed via the app or web-interface.
Update in progress – green/yellow circle
Your controller is currently updating. Please do not power off!
Programming mode – single yellow led in circle
The mode to configure your AC sockets is currently active. Be aware that control is disabled during this mode!
Connection attempt – blue circle
The controller is currently trying to connect to the specified WiFi network.
Warning – flashing green/yellow
A minor problem has occurred. Connect to your controller to learn more.
Error – flashing green/red
A major problem has occurred. Connect to your controller to learn more.
Hardware error – solid red
A serious hardware error has occurred. Please contact our support.
To reset your controller to factory defaults press and hold the button in the center of the controller until all LEDs have turned yellow. (Your controller must not be booting or updating.)
Software
You can download our app in the appropriate app-store for your device. For android smartphones we also provide a direct apk download.
If you don’t own a smartphone you can also use our controller via its web-interface with any WiFi capable device with a browser.
![]()

If you do not have, or do not want to use a smartphone, you can also use our controller with any WiFi capable device via its web-interface. Just connect to the WiFi network of the controller and open the following address in your browser:
http://10.20.30.1
The following steps describe how you can use your Fridge Grow Controller to create the ultimate, hermetically sealed, grow tents.
The conversion is not difficult and can be done in about 1 – 2 hours.
NOTE:
All modifications must be carried out professionally and in compliance with all locally applicable regulations.
and, if in doubt, approved by a locally authorized specialist company before commissioning
become. All components used as well as the overall system must be expressly intended for the intended
Intended use be certified. We do not accept any liability for any damage.
If you need help, don’t hesitate to contact us through one of the following channels:
• Fridge Grow Telegram: https://t.me/fridgeGrowPublic
• E-Mail: info@fridgegrow.com
Fridge conversation guide
Controller

Fridge Grow
Ac plugs

4 pcs. (Intertechno IT-3000 compatible)
Fridge

suitable model*
LED

50 – 200W
Heizung

150 – 500W
CO2-Supply

controllable, e.g. for aquariums
Fans

2 – 4 pcs.
Micro-USB-Supply

min. 2A current
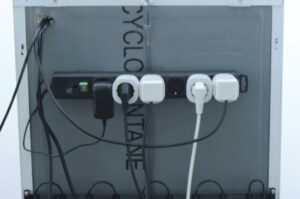
Power distributor

min. 5-fach
Aluminium sheet

Width of your fridge x 30cm
Tools

cable-ties, duct-tape, scissors, knife
Pots + substrate

Soil, Hydro…
1. Measure cooling area
Empty out your fridge. Turn it on and leave it running, with the door open, for around 5min. You will find water condensing on the backside inside the fridge, but not all the way to the bottom.
Mark how far down the condensation reaches
2. Make a hole for the cables
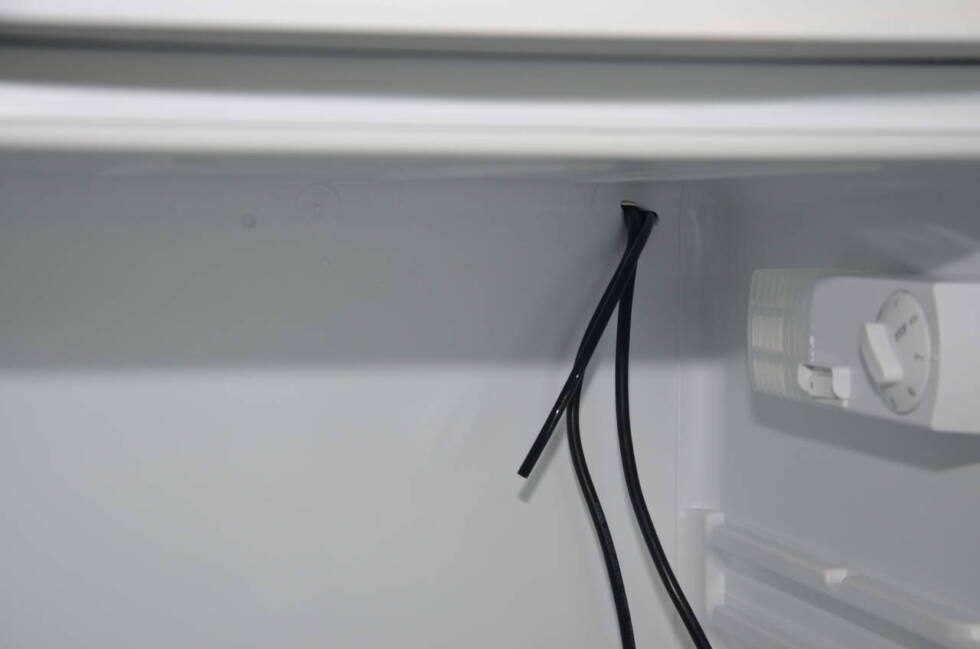
Make a hole in a spot that stayed dry during the first step. In many fridges the top corners are very suitable for this.
Ensure that no cabling was damaged! If in doubt consult an expert!
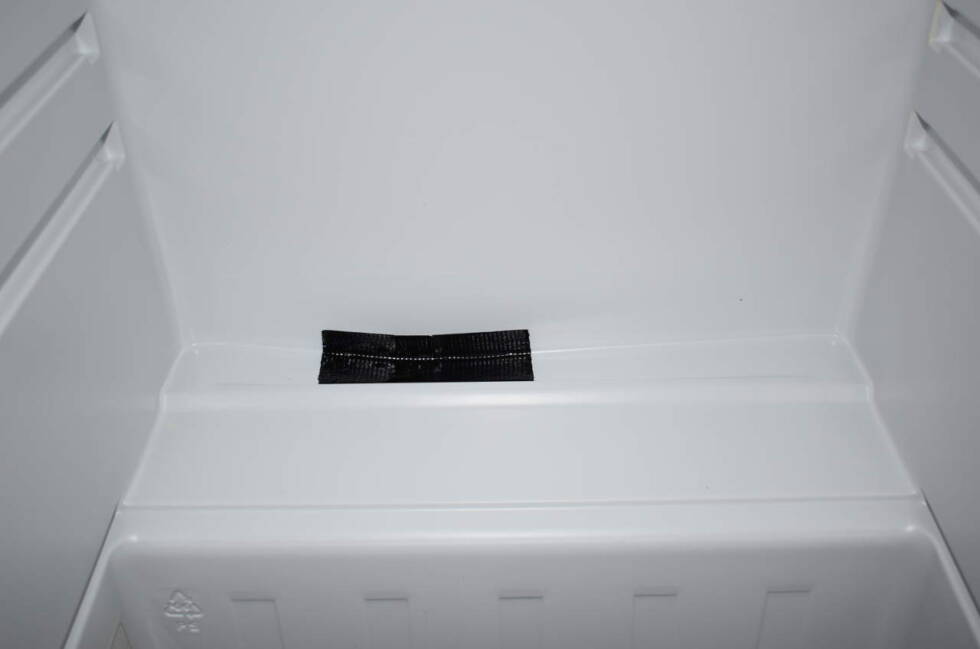
3.Plug condensation try
Plug the hole in the condensation tray with a piece of tape. Ensure it’s air-tight otherwise unpleasant smells could escape form your grow-box.
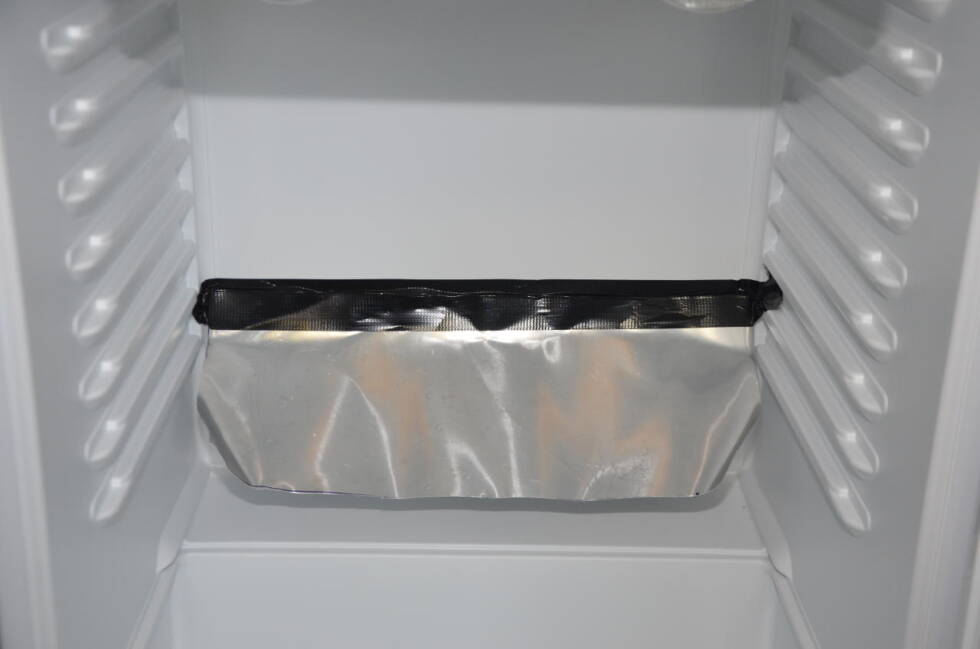
4. Mount aluminium sheet
Cut a piece of aluminium sheet to the width of your fridge and mount it with a piece of tape just below the line you marked in step one.
This will collect condensed water and return it to your plants.

Controller, LED lamp, heater and fans must be placed inside the fridge. The simplest way to mount those is using cable-ties and the grills that come with the fridge.
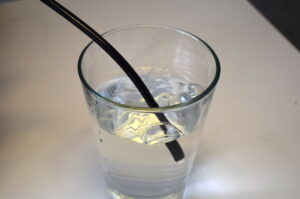
1. Adjust CO2 flow
Adjust your supply for a low flow of CO2 gas. If you hold your CO2 hose in a glass of water you should easily be able to count the bubbles.
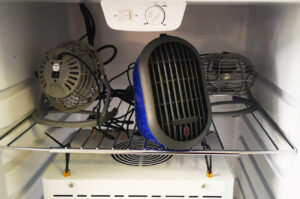
2. Mount everything
Mount all needed parts inside the fridge and guide the cables through the hole you made earlier. Put the CO2 hose from outside through the same hole.
3. Mount controller
Find a good spot for the controller. The CO2 sensor is inside the device and the temperature and humidity sensor can be placed freely. Ensure both sensors get a good flow of air.
4. Connect everything
Mount the power distributor on the outside of the fridge. LED lamp, heater, fridge and CO2 supply must be connected via remote controlled sockets. Fans and the USB supply can be connected directly to power. Mark the remote controlled sockets based on the device you plugged in.
The conversion is done! Now you just need to connect to your controller, configure it and configure the remote controlled sockets.
1. Download and install app
Download our Fridge Grow App and install it on your smartphone.
When you start the app for the first time 300Mb of additional data need to be downloaded.
2. Power and boot controller
Connect your controller to power and wait until it has booted.
During booting the controllers LEDs will run in a circle. After around one minute the LEDs should turn solid yellow or green and the controller has finished booting.
3. Connect to WiFi
Connect your smartphone or computer to the WiFi network created by the controller. You will find the credentials on the backside of the controller.
If you are using your smartphone ensure your have confirmed the “Network has no internet connection” popup.

4. Connect app to controller
Once your are connected to WiFi your app sould automatically discover your controller.
If you are using a computer open the following address in your browser: http://10.20.30.1
5. Initial configuration
When you connect to your controller for the first time our app will ask you to configure it. You can get to the same site at any time via settings -> general.
Choose a preset that fits your plants and save the settings.
6. Configure remote sockets
After initial configuration our app will ask you to configure the remote sockets. Yur can get to the same page at any time via settings -> AC sockets.
Follow the guided wizard inside the app to configure your remote sockets.
Done
You made it! Your brand new grow-box is now ready to use!
Fridge conversation guide
Controller
Fridge Grow
Ac plugs
4 pcs. (Intertechno IT-3000 compatible)
Fridge
suitable model*
LED
50 – 200W
Heizung
150 – 500W
CO2-Supply
controllable, e.g. for aquariums
Fans
2 – 4 pcs.
Micro-USB-Supply
min. 2A current
Power distributor
min. 5 times
Aluminium sheet
Width of your fridge x 30cm
Tools
cable-ties, duct-tape, scissors, knife
min. 5 times
Pots + substrate
Soil, Hydro…
1. Measure cooling area
Empty out your fridge. Turn it on and leave it running, with the door open, for around 5min. You will find water condensing on the backside inside the fridge, but not all the way to the bottom.
Mark how far down the condensation reaches
2. Make a hole for the cables
Make a hole in a spot that stayed dry during the first step. In many fridges the top corners are very suitable for this.
Ensure that no cabling was damaged! If in doubt consult an expert!
3.Plug condensation try
Plug the hole in the condensation tray with a piece of tape. Ensure it’s air-tight otherwise unpleasant smells could escape form your grow-box.
4. Mount aluminium sheet
Cut a piece of aluminium sheet to the width of your fridge and mount it with a piece of tape just below the line you marked in step one.
This will collect condensed water and return it to your plants.
Controller, LED lamp, heater and fans must be placed inside the fridge. The simplest way to mount those is using cable-ties and the grills that come with the fridge.
1. Adjust CO2 flow
Adjust your supply for a low flow of CO2 gas. If you hold your CO2 hose in a glass of water you should easily be able to count the bubbles.
2. Mount everything
Mount all needed parts inside the fridge and guide the cables through the hole you made earlier. Put the CO2 hose from outside through the same hole.
3. Mount controller
Find a good spot for the controller. The CO2 sensor is inside the device and the temperature and humidity sensor can be placed freely. Ensure both sensors get a good flow of air.
4. Connect everything
Mount the power distributor on the outside of the fridge. LED lamp, heater, fridge and CO2 supply must be connected via remote controlled sockets. Fans and the USB supply can be connected directly to power. Mark the remote controlled sockets based on the device you plugged in.
The conversion is done! Now you just need to connect to your controller, configure it and configure the remote controlled sockets.
1. Download and install app
Download our Fridge Grow App and install it on your smartphone.
When you start the app for the first time 300Mb of additional data need to be downloaded.
2. Power and boot controller
Connect your controller to power and wait until it has booted.
During booting the controllers LEDs will run in a circle. After around one minute the LEDs should turn solid yellow or green and the controller has finished booting.
3. Connect to WiFi
Connect your smartphone or computer to the WiFi network created by the controller. You will find the credentials on the backside of the controller.
If you are using your smartphone ensure your have confirmed the “Network has no internet connection” popup.
4. Connect app to controller
Once your are connected to WiFi your app sould automatically discover your controller.
If you are using a computer open the following address in your browser: http://10.20.30.1
5. Initial configuration
When you connect to your controller for the first time our app will ask you to configure it. You can get to the same site at any time via settings -> general.
Choose a preset that fits your plants and save the settings.
6. Configure remote sockets
After initial configuration our app will ask you to configure the remote sockets. Yur can get to the same page at any time via settings -> AC sockets.
Follow the guided wizard inside the app to configure your remote sockets.
Done
You made it! Your brand new grow-box is now ready to use!
Grow tips
A closed system handles a bit different than conventional grow-boxes. We have collected a few tips for you to ease your way into this new style of growing.
Use solid fertilizer
Dosing liquid fertilizer can be a bit tricky in a closed system, thats why we’d recommend, especially for beginners, to use solid fertilizer instead.
Solid fertilizer can simply be added to the soil and used just like in a conventional grow-box.
Liquid fertilizer must be given in high doses
If you choose to still use liquid fertilizer make sure to use a much higher dose than you normally would. This is because any nutrient solution you add constantly gets diluted by re condensed water.
You will need around 10 times more fertilizer per liter of water than usual. However, this value highly depends on your setup and type of plants. Also not every fertilizer can safely be added in such a high concentration. Therefore we do not recommend the usage of liquid fertilizers.
Be aware of over watering
Due to the highly reduced water consumption inside a sealed system plants are much more susceptible to over watering then normally.
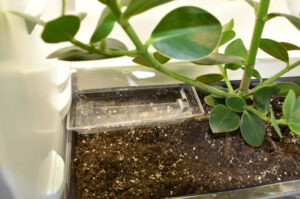
Pay attention to the weight of your pots and make sure the soil is only damp and not completely wet.
Extracting water
Whether you over watered your plants or just want to dry them out so you can add more nutrient solution, there is a simple way to extract water from the system.
Simply put one or two small pots under the aluminum sheet to collect the condensing water and empty them out regularly until your soil has dried out as desired.